Playroom

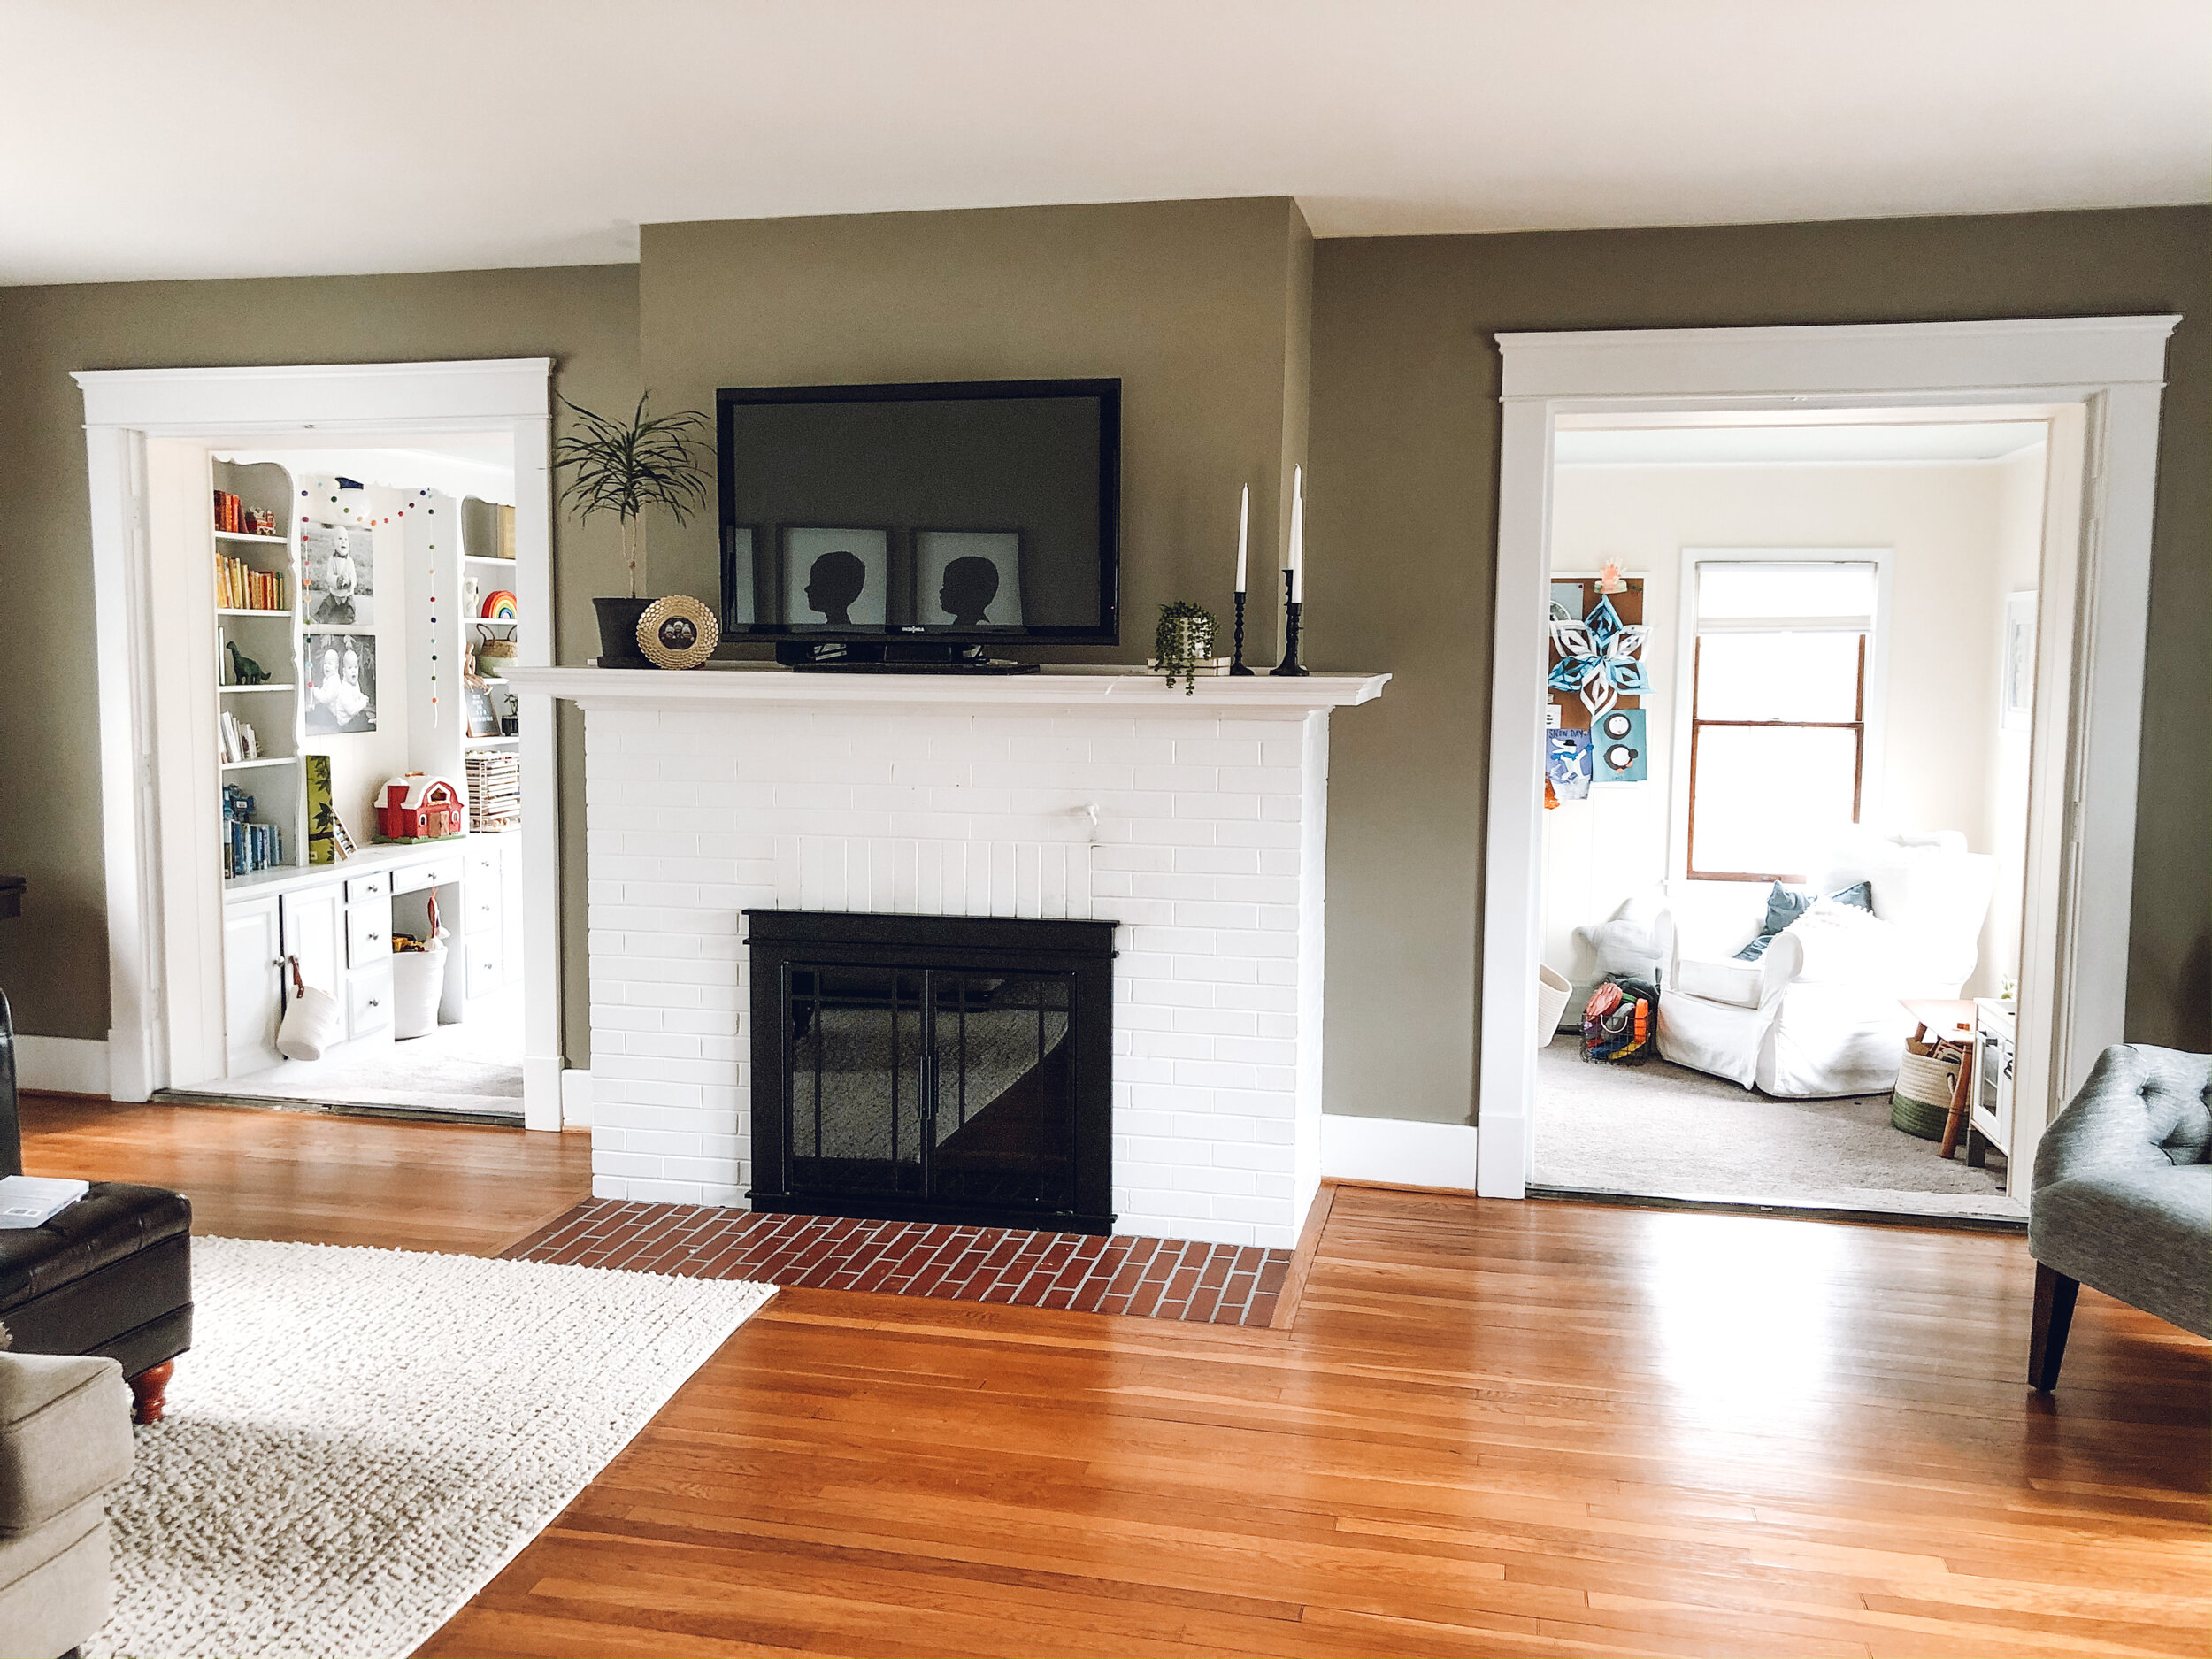
My oldest is 6 years old and our playroom is finally finished! It’s perfectly-imperfect, with chipped paint and all, but we have so many memories in this sweet room! We moved into our current house almost 3 years ago. At the time, J was 3 and the twins were a couple weeks old. We threw everything into their respective rooms without much thought. Finally, I feel like I’m in a place where I can be more intentional about what we keep and where it goes.

My boys are very lucky and have a lot of family that likes to buy them gifts and we had a TON of toys, so much so that this pretty decent sized room was a huge closet to store all the things. We had a 16 cube kallax, with a big bin in each cubby, filled with toys. Even with all those toys, the boys were struggling to play on their own. I started by getting rid of their plastic play food in their kitchen (I started by storing them in the basement in case I regretted the decision). The boys INSTANTLY started playing with their kitchen again (!!!!!). When you think about it, it’s very hard to pretend to cook with whole hard plastic food. By using things like pompoms, small beads, and other small items, their creativity took off. Try it! :) That was just the inspiration I needed to keep it going. Next, I got rid of the pretend play tools. They miraculously started using their wooden blocks again by building and using other blocks as hammers, etc. I swapped out the 16 cube bookshelf for the 8 cube one and made everything accessible for little bodies. I also tried separating out things into smaller bins instead of the larger ones. I think we finally have a good mix!

We live in an old house and our playroom is an old converted porch, right off the living room, so we see it all the time. It drives me a little nutty when it’s messy, which is why we try to keep it clean.In real life, we do keep a mini trampoline in there (which the boys use DAILY) but I took it out for photos because it makes it look so much more cluttered.

First up are some photos from before we moved in and one during the move with our little loves.

The first thing we did was paint the walls, ceiling, and beams. We also switched out the outlets to THESE childproof outlets. Shortly after, we put on these radiator covers since the previous ones were not safe. A little pricey for a cover, but much less than replacing them and super easy to install. They also sell the radiator covers at lowes for less sometimes.

IMG_0299.JPG

We do have the original French doors, but the boys were constantly slamming them so we had to take them down for safety.

IMG_6604.jpg

vacuum // blocks

I found this wooden table on Facebook marketplace for $10 — it’s so sturdy! Secondhand pieces are the best. In that basket is where the wooden blocks are stored. Since our house is old, the heating is crazy. This room has its own thermostat which is ancient and covered in paint. I painted one of those wooden bins that a Melissa and Doug toy came in to cover the thermostat. Every single dad that has come into our house takes if off and says not to do that, but it's been fine so far in this small room! There’s some ventilation.

IMG_6607.jpg
IMG_6611.jpg

PCH print

It was a sad day when I moved the nursing chair out of the nursery, but it’s nice to have a home for it instead of giving it away. It still gets a lot of use reading books!

IMG_6612.jpg

dollhouse // dollhouse furniture // hanging basket // fabric basket // farm blocks // blue basket

My boys love this sweet dollhouse and I love that it can be installed into the wall to free up some table space. We have some extra dollhouse pieces, so my husband drilled in a hook to the side for a basket for the extra pieces. Underneath, one basket stores some dressup clothes and puppets. The other holds farm blocks.

IMG_6614.jpg

hoberman sphere // tissue holder

I like having the top of this mostly clear for more tablespace — there never seems to be enough surfaces for playing. I like to have a basket out of the current favotire / seasonal books.

Top row, left to right: Small cars and trucks in the blue bin, “guys” in the smaller basket // small animals, bigger animals, magnatiles // random stuff in the basket, “tablets” // paper, stickers, workbooks.

Bottom row, left to right: Random stuff // fisher price toys from Christmas // trains and tracks // big trucks.

IMG_6643.jpg

stepping stones // nugget // octopus pillow // corkboard // wooden names //rug

The nugget!! We love this thing. It can be configured so many different ways; the boys have not stopped playing with it since they got it for Christmas.

IMG_6633.jpg

table

I tried painting the plastic table and it’s already chipping! I may need to find something stronger. We painted the ceiling blue and the beams white.

IMG_6641.jpg

map // lego organizer

This wall isn’t finished. I still need to get something for either side of the map (I’m thinking 2 square black and white photos on each side — maybe of the boys eating watermelon this summer?!) The map was inexpensive and my husband built a quick frame for it.

IMG_6648.jpg
IMG_6623.jpg
IMG_6624.jpg

We store games in this cabinet and some random things in the drawers (odd sized puzzles, Lego manuals, lacing things, etc.)

IMG_6638.jpg

pompom garland & hanging rainbow // light // barn // abacus // puzzle organizer // felt letter board // stacking rainbow // body magnet puzzle // you feel like sunshine // wire basket

These canvases are pictures of all the boys on their first birthday wearing the same outfits <3. In the right cabinet is where the arts and crafts are stored. We spray painted this inexpensive light navy blue for something a bit more fun in this space.

IMG_6655.jpg
IMG_0283.jpg

I really like this little room and think it will serve us well through the years. I have visions of it being a homework room a bit later, with one long desk along the window wall, with 3 seats (like the one pictured below). And with a daybed eventually (our guest bedrooms are on the third floor, so hard for older adults to go up and down).

How-To-Create-A-Homework-Area-For-Kids-set-up-a-distraction-free-work-space.jpg


Via HGTV Fixer Upper

But for now, I’ll enjoy it as-is. I love hearing my kids playing in the next room. It’s amazing to think of all the memories they will create in there! <3

**As an Amazon Associate I earn from qualifying purchases. I may receive a small commission when you click a link and

make a purchase, at no extra cost to you. I appreciate your support!**


Mix and Match Pots and Pans List

My husband laughs when I call myself a minimalist because we have a LOT of stuff, but I follow the konmari sentiment and try to stick to having only things we use and love. Even back when we registered for our wedding (over 10 years ago now!!), I knew I wanted to avoid a big expensive cookware set. I registered for just the pieces I really wanted and, cooking on them every day for 10 years, they have been exactly what we needed. I thought that everyone did this until I shared what I used in a facebook group and some people were so intrigued!

Here are the pieces that I love and use almost daily! I tried to sort them by the amount they get used, but honestly they all get used so much! They all look brand new with the exception of the nonstick skillet as explained below. Also, this is just the things for cooking, not baking.

If something does stick on a stainless steel or the enameled cast iron, I use this and it scrubs right off!

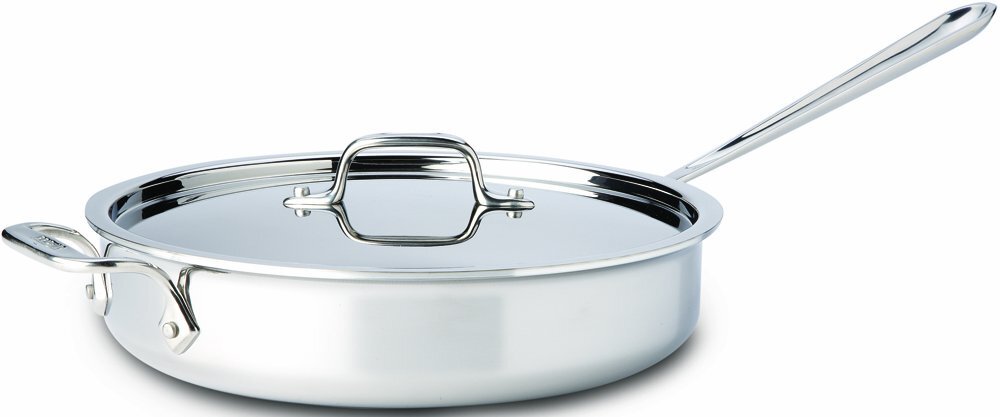
All Clad 3 quart Sauté Pan with Lid — I use this piece ALL THE TIME. It’s the perfect size for almost anything. I love that it can go in the oven.

Lodge Cast Iron Skillet with 2 loop handles — This is great for searing meat and putting in the oven, veggies on the grill, (camping if we camped!), browning taco meat, etc. I like the loop handles for fitting on our small stove/oven/grill without competing with other items. I have the 12” which is fine but wish I had 15 or 17”!

Cuisinart Pasta/Steamer Set — I LOVE my all clad above for heavy work but didn’t think I needed to spend the extra money on an allclad pasta pot since it mostly boils water for potatoes and pasta and steaming vegetables. We also use it for making popcorn regularly. This has worked out great for us.

All Clad Saucepan — I use this for rice, risotto, etc. I have all clad because that’s what I registered for but as above, I think any stainless steel brand would work well.

Le Crueset Oval Dutch Oven with Metal Handle — Definitely a splurge but this has been great — I use this all the time for soups, stews, roasts, chili, and I’ve even made bread in it! I like that it has a larger surface area for sautéing / searing since I always at least double a recipe. If I use my pasta pot above, it tends to steam the veggies instead of sautéing them nicely. I did have one problem with the enamel a couple years ago and they sent me a replacement at no extra charge. It had been several years since purchased as a registry gift and obviously I did not have a receipt. They stand by their product!

Calphalon Nonstick— I have not figured out how to cook eggs in anything other than a nonstick skillet yet. With at least once daily use, I have to replace our nonstick skillets pretty often. It’s the only pan that doesn’t look brand new still. These work great for frittatas and can go in the oven.

I also have a smaller all clad sauté pan that doesn’t get used much — I find I can use the big one for just about everything and only pull this out if I need to have a second pan out at the same time I’m using the big one.

Oh! I did the same thing with our knives: 1 good chef’s knife, 1 good bread knife, 1 good pair of kitchen shears.

**As an Amazon Associate I earn from qualifying purchases. I may receive a small commission when you click a link and make a purchase, at no extra cost to you. I appreciate your support!**

Stocking Stuffers

I thought I’d share some fun stocking stuffers I found! My kids are at a hard age (5,2,2) for stocking stuffers, I think. Their stockings are pretty small and they are too young for fun small gifts. I found some of these gems at a local gift store, but it looks like they are all available on amazon prime! Perfect for last minute stockings or gifts! Just click the photo and it will bring you directly to the amazon link. Sorry the photos are so large — still trying to figure this out!

**As an Amazon Associate I earn from qualifying purchases. I may receive a small commission when you click a link and make a purchase, at no extra cost to you. I appreciate your support!**

Christmas Day Plan

Parents know how hectic December can be, and December has been kicking my butt hard this year!! Christmas Day as a child was always very stressful for me as my parents were divorced and I was always going from place to place. Now that I have my own children, it’s very important to me that we stay warm and cozy inside — so we invite everyone over here so we don’t have to leave the house! We have a magical Christmas and we all look forward to it every year. It’s the perfect reward for a never-stop-moving December. My in-laws have a lovely and fancy Christmas Eve dinner where we get to dress up and eat on fine China — so Christmas Day we are very casual (I’m talking PJs all day casual!) and set food out for people to take as they please. We used to have the immediate grandparents over earlier and everyone else a bit later but that was a bit much on me. This year, I asked if everyone could come at the same time around 10 and thankfully everyone was ok with the new plan. That helps make meal-planning a bit easier as well since before I’d have breakfast food early and also lunch food later. I’m simplifying the menu a LOT this year and making basically everything ahead!

Breakfast

(just us)

  • Hardboiled eggs and/or bacon (made ahead)

  • Cinnamon rolls (not the BEST ingredients, but it’s Christmas!)

  • Hot chocolate with marshmallows (cheaper from target but I couldn’t find a link — we really like the “cocoa” flavor — the rest have been meh).

Brunch (heavy on the UNCH)

to be served around 11

  • Ham with mustard and homemade applesauce

    • Ham is so easy and festive — I will buy the jarred sauce, slather it on, and throw it in the oven!

    • Applesauce made this fall from apple picking and frozen, just thaw and throw in a bowl!

  • Spanakopita

    • Also frozen — freezing and baking instructions in recipe.

  • White velvet soup

    • Will make on Christmas Eve and reheat in crockpot and serve with mugs on this mug tree. Omitting the toppings. Fun side note — my kindergartener came home from school with an assignment to share a recipe for a class holiday cookbook and he chose this!!

  • Bread / rolls

  • Clementines in a bowl

  • Christmas cookies (I like this recipe) and make a simple frosting with powdered sugar and almond milk and a touch of almond extract.

  • Americas Test Kitchen chocolate mint cookies (THE BEST— I think that is the correct recipe)

  • Olive and cheese wreath

    • Rosemary to look like a wreath dotted with olives, whole grape tomatoes, and mozzarella balls

  • Veggies with white bean dip if I have time

Drinks

(to be out all morning / day)

  • orange juice

  • cranberry juice

  • champagne

  • egg nog

  • water

  • coffee with cream and sugar

I’m going to put the juices and egg nog in these adorable glass bottles in the awesome tub from IKEA! Will use snow instead of ice if we have a white Christmas this year!

Dinner

We are having beef on Christmas Eve and ham for brunch and wanted something EASY and different for dinner. This is what we came up with:

  • Salmon (a huge piece — will hopefully grill it if there’s not too much snow)

  • Cheesy orzo

  • Simple salad (goat cheese, candied nuts, balsamic vinaigrette)

For dessert I’m playing it by ear but the two options are this cake or making a cake from a box in my new Bundt pans (single large gingerbread house or mini gingerbread houses !!!!!!) and letting the kids sprinkle it with “snow” before eating with this!!

**As an Amazon Associate I earn from qualifying purchases. I may receive a small commission when you click a link and make a purchase, at no extra cost to you. I appreciate your support!**


Mantle Advent Calendar

I was struggling with what to do for an advent calendar this year with 3 kids. We have a very small one from Target that I used with my oldest but now that the twins are older, I knew we needed something bigger. I came up with this mantle advent calendar! It was so much fun to put together!

IMG_6626.JPG
IMG_6585.JPG

It’s pretty simple to put together. I’ve been stockpiling random sized boxes (nothing fancy — just some amazon boxes or old jewelry boxes) and random holiday goodies throughout November. I found some leftover kraft paper envelopes from old Christmas cards. I tried to add a mix of “fillers” and listed them below. I made sure to switch up the contents to the size of the boxes — some of the big boxes have just a piece of paper with experiences.

First, I made a list of December dates 1-24 and added things that were already in the calendar (going to see the Nutcracker, seeing Santa, etc.). Next, I made a list of small things I wanted to accomplish during the holiday season and looked at the calendar to see when would be a good day to do those. Last, I filled in the remainder days with chocolates and inexpensive goodies.I have a master list and gently taped the numbers on the boxes, so if something changes with our schedule, I can easily change the dates.

I printed the numbers via this blog on heavy cardstock, wrapped the boxes with kraft paper and twine, and stuck them on the mantle with this stuff — way better than tape and it won’t peel the paint! The small, colorful boxes are from IKEA and linked here (they have a whole set of 25 but I just used a couple to make it last for a couple of years!).

Here’s what we have in our boxes this year:

  • decorate the tree

  • make paper snowflakes

  • chocolate coins and special santa chocolates

  • Christmas socks ($1 each from the Target dollar spot!)

  • Holiday party

  • Christmas movie at a theater

  • make snow globe villages

  • have hot chocolate with marshmallows

  • snowflake bath bomb

  • make a birdfeeder (the old toilet paper roll and peanut butter with seeds)

  • decorate gingerbread houses

  • wooden paint set from Target dollar spot ($1 each)

  • a couple sets from this lego advent calendar (a good investment — purchased last year and used some then, plus some this year, and we still have a bunch left for next year and the year after!)

  • go to the festival of lights

  • go caroling

  • see santa

  • decorate cookies

  • open Christmas Eve box

I only did 1-24 and will put up the stocking on Christmas Eve. I’m a big do-ahead person so I’m so excited I’ll be able to do the stockings ahead of time!

DDCBF9D1-8B81-4CF1-BDD3-3B80AB8CC88F.jpg
IMG_6231.jpg
IMG_6234.jpg
IMG_6690.JPG

*As an Amazon Associate I earn from qualifying purchases. I may receive a small commission when you click a link and make a purchase, at no extra cost to you. I appreciate your support!*

Our Mealtime Rhythms

On Instagram, I share our family meals and I get some questions about our mealtime and routines surrounding food. I have shared this in Instagram stories before, but I thought it’d be nice to have it all together in one spot. I don’t want to call them our rules because the term “rule” seems established and enforced. These are just some mealtime rhythms I’ve noticed and over time have been intentional with my family. Most of them have been integrated into the fabric our daily lives since our children were infants so there’s no need to “enforce” anything. Of course, there are exceptions to the outline below. I am writing what we do MOST of the time. If we go to a party, my kids eat whatever food is available. Just today, they filled up on the appetizers out (cheese and crackers) and didn’t eat one vegetable at dinner (and they still got cake for dessert!). They have hot chocolate in December and fresh apple cider in the fall.

Full disclaimer: I am not a doctor or nutritionist or feeding therapist. I am sharing how I feed my family and in doing so I am NOT saying this is how you should feed your family or that you should compare how your family eats to how mine eats. I also feel like I need to point out my privilege by saying that I am a mostly stay at home mom and am able to reinforce these habits ALL.DAY.LONG. If I worked full time, I am sure mealtimes would look differently. Also, I have neurotypical children without any feeding aversions.

Before I begin, I want to share something from a course I went to. They showed a video of some gross bugs that people were eating. Humor me— imagine a small container of wiggly, slimy worms. Someone is making you eat them all before you can eat anything else. You are crying and starving and gagging. You eat them and they burst into your mouth and are just as awful as you imagined. You keep eating and eating because you are being forced to, crying the whole time, phlegm running down your throat.

I know that is an extreme example, but when we force our children to eat something they do not want to eat, we break the trust and also ruin our chance at our child liking that food. Will they eat it? Yes! EATING IT SHOULD NOT BE THE GOAL. Think about that for a moment. When you are trying to get you child to eat a vegetable, what is the goal? The long term goal is for your child to have a healthy relationship with food, and to enjoy “healthy” foods, right? The broccoli you serve to your children may be like the worms to you. If feeding your child is a battle and you force them to eat something they don’t want to eat, you both lose. Mealtimes should be about love, warmth, comfort, sustenance, and togetherness.

Our focus as parents should be on what we SERVE our children. Let your children focus on what they eat. We teach them that they are in control of their bodies and they shouldn’t do something that makes them feel uncomfortable. We need to apply that same respect and autonomy to food. Ellyn Statter is the expert in feeding children.

A little background information: I said earlier that this started in infancy and that’s true. Even before our kids could eat, they were sitting in their high chairs during mealtimes watching as we ate. The stars aligned and we did our first whole30 when our oldest (J) was about 6 months old and starting solid foods. We did baby led weaning and fed him (safely prepared) food off of our plates at mealtimes. At 6 months, his primary nutrition came from breastmilk. We didn’t do any snacks, following our 3 scheduled meals with whole30. All of our kids nursed until 23 months, so I think its important to note when I say they didn’t snack on food, they did get whole (breast) milk throughout the day for almost 2 years. I think it’s important to note here that I did not grow up eating vegetables, I don’t really love vegetables, and I have a terrible relationship with food. I am so passionate about this because it is such a struggle for me. While I work on myself, I am trying to do better for my kids. I think it’s actually been very helpful that I don’t like vegetables — by doing a whole30, you learn how to cook them in different ways to be more palatable. I would be so sad eating chicken breast, roasted sweet potatoes, and steamed broccoli every day.

We don’t eat whole30 anymore but it really helped shaped our daily mealtime rhythms.

1. We only drink water (mom and dad drink coffee and wine, of course). The kids have access to water all day long and can drink it when they want. Milk is SOOO filling and has a TON of nutrients, so if your child drinks a lot of milk they may not be hungry at mealtimes. Some nutritionists recommend limiting milk if your child drinks it, check with a doctor or nutritionist for guidelines. We generally don’t eat dairy (see note above about breastmilk) so I am very mindful about making sure my kids get offered a lot of “fat” at meals (more on that later). I do offer some dairy products regularly so that I don’t induce a diary allergy (maybe 1 serving of dairy every day or every other day is what we do— in the form of grass-fed butter in our eggs or on a paleo treat, some unsweetened whole milk yogurt or cheese, or just going out to eat). Of course, this is what we do MOST of the time. We have homemade hot chocolate a couple times in the winter, some warm apple cider in the fall, and homemade lemonade in the summer.

2. We don’t snack! I know this is huge for kids and again I’m just sharing what we do; your child may need to snack! We have 3 meals a day and once in awhile I offer a veggie only snack after nap / before dinner (no pressure to eat it). Now that my oldest is in kindergarten, I do pack him a snack per protocol and he eats it and still eats the rest of his meals, but I usually just pack a piece of whole fruit or some raw veggies. He is always allowed to finish his lunch when he gets home if he didn’t have time to finish. But in general, this no snacking thing is huge for us. Since we’ve always done it, my kids aren’t asking me for snacks all day. They very rarely tell me they are hungry in between meals. I think this is because our bodies get used to whatever we do regularly. I think that since they don’t snack they eat enough at meals and aren’t really hungry until the next meal. If they do say they are hungry in between a meal, I know they mean it because they really don’t say that much (honestly they might say that a couple times a year!). If they do, I try to assess the situation as it comes up. If it’s close to a mealtime, I will say “Ok, thank you for telling me. I’ll try to hurry up cooking. Would you like a carrot while you wait?” (and I do try to speed it up or move it earlier). If I can’t move up the next meal, I will offer a snack of veggie and fruit to tide them over. This no snacking thing REALLY comes in handy when you need it to — its so novel that if we get stuck somewhere awful they get so excited for snacks. For example I had to drag all 3 kids to urgent care and I packed some snacks they were in freaking heaven. When I started brining them all by myself to get their haircuts, I’d pack some fresh peppers. cucumbers, and apples to munch on while they waited. Everyone was amazed that they ate them — they weren’t used to snacks and were so excited to eat somewhere other than the kitchen table!

3. At each meal I OFFER a protein, fat (extra important for my nondairy peeps), carb, and veggie. Sometimes the carb is rice, potato, candy, butternut squash, baked good, etc. They decide what to eat. This naturally gives them a variety of things to choose from. I don’t encourage them to eat anything or praise them for eating anything (family members etc. do this and I don’t say anything, basically because I don’t have a backbone and that would be awkward haha). A brussels sprout is the same as a Reese in our house. “Oh my gosh did you try the Reese!? I just love the chocolate and peanut butter flavor together. What do you think?” “Oh my gosh, did you try the roasted brussels sprout? I just love the crispy bacon and roasted brussels sprout together! What do you think?” It sounds like a lot of work, but it’s so much less stressful as a parent when you only have to worry about what you OFFER at each meal! Pick one thing from each category and done. They don’t have to all “go” together. Lots of times I realize I forgot to offer a fat at a meal and give my kids a scoop of peanut butter after dinner.

4. One family one meal — again there are some exceptions to this (like date nights), but I generally try to stick to this. it helps me to eat healthier and it helps me to make deliciously prepared meals and vegetables. Again, when you are not worried about what you child EATS, just what you SERVE, you are freed to serve a salad to your child with no strings attached. Think of it as a garnish. I served my kids salads for a LONG time and they never touched it. Guess what, salads are one of their favorites now! I also generally do not make “fun” food or kid-type food (except for school lunches, holidays, and birthdays). This is just my personal opinion but I think sometimes if we hype up something so much it can seem like we are tricking them into eating it, or that we really want them to eat it. “Look at this fun way we can eat broccoli!! WHOOA LOOK HOW COOL!!!!! LOOK AT THIS FUN WAY I CAN DRESS UP A SLIMY WORM!!! DOESNT THAT LOOK FUN AND DELICIOUS.” When we serve food matter-of-factly, it can seem like not a big deal. “Oh this broccoli is roasted alongside the potatoes and chicken. It’s no better/ no worse.” They feel a lot more comfortable trying something on their terms. They feel safe to take a tiny bite of broccoli without eyes on them and put it back if they want it. I do not make them something else if they don’t eat a meal. I always get questions about this. It’s been 5 years of me doing this and they have never said they were hungry. Since there is usually a variety on their plate, they choose what they want to eat. If they don’t eat anything and they truly aren’t hungry, making them a peanut butter sandwich after their meal is going to make them not listen to their bodies and push through to eat something more palatable. If I’m not that hungry but someone offers me a chocolate cake — I will eat it 10/10 times. Again, if you child is not gaining weight or falling off their growth curve, this will not work for you and you should seek guidance from a nutritionist. I am just sharing what works for us and weight isn’t an issue for our kiddos.

5. We eat our 3 meals at the table, with no toys or distractions and we all sit there until the last person is done. Since this is what we’ve always done, my kids don’t even know its an option to get up and go somewhere else. (They are not perfect, don’t worry. More on that later). It’s very important for me that they aren’t rushing through their meals. If they knew they could go play with the hot toy as soon as they finish, they will rush and go play with that toy. If they know they are stuck at the table forever anyway, they might as well eat. It’s really the only time that we all really connect during the weekday.

6. No one gets seconds until mom finishes her first plate. I’ve had to implement this recently, but its worked out really well. This was happening a lot: dinner is chicken, butternut squash, broccoli, and nuts. Kids finish their butternut squash and nuts before mom sits down and they ask for more. Mom spends entire meal getting up to get more butternut squash and boys don’t eat chicken or broccoli, mom doesn’t get any butternut squash.. Since implementing this new “rhythm,” it forces them to SLOW DOWN. They eat their butternut and nuts and ask for more. I say, “yes, I will get you more when I’m done eating. You may wait patiently or you may eat your broccoli and chicken if you’re hungry.” Miraculously, they have been eating the other foods while waiting. It’s been a lot more relaxing for me, as well.

7. I try not to limit them too much when going out to eat, but do try to not order off the kids menu. NOT because that food is “unhealthy” but because I want them to try new foods and appreciate foods from other cultures or a food that is prepared by someone different. Mac and cheese, chicken nuggets, burgers, etc. all taste the same at each restaurant. This is not to say that I don’t order them these things ever! (well they’ve only had chicken nuggets once). They’ve had fried mac and cheese balls as a food festival, wood-fired pizza at an Italian restaurant, juicy burgers at a bar, etc. I’m sure this will change as they get older, but for now it’s working for us. It’s also (usually) a lot cheaper to get one big adult meal split by 3 kids than to get 3 kids meals (since they just drink water anyway). if we go to a restaurant and they have bread, they eat the bread! No limits. I do try to order some veggies when we go out to eat. Sometimes they surprise me and eat a ton, sometimes they don’t touch them. It’s fine either way! Just a reminder to them that veggies are always there. Do they always like everything we order when we go out to eat? No! That’s ok too! They usually find one thing between their plate or my husbands or mine, but they will eat at the next meal!

8. Don’t make food generalizations. I cringe anytime a parent says “oh my kid doesn’t eat broccoli.” What does that say to the kid? “I don’t eat broccoli!” We all have fluctuating tastes and preferences. Do you eat the same foods you did as a kid? What about 5 years ago? I used to LOVE sweet potatoes and ever since becoming pregnant with L&V, I’ve been more aversive to them. I still serve myself them and sometimes I eat them and sometimes I don’t but I don’t say that I don’t eat them, just maybe not right now. Sometimes I want to eat my broccoli and sometimes I don’t! Sometimes I’ll like it for dinner but not leftover for lunch. Sometimes I crave leftovers and can’t wait for lunch! Can you relate? Don’t put you kid in a box either. Just keep offering — no pressure. I try not to note out loud what they ate/ didn’t eat. If someone makes a generalized comment, I’ll try to correct. If they say “I don’t like broccoli” I’ll say “you didn’t feel like having broccoli today, that’s ok!”

I hope you don’t think our mealtimes are all sunshine and rainbows. We don’t battle over food, but there are plenty of things that I do enforce at the table, which, having 3 boys is a CONSTANT struggle.

We don’t focus on the foods eaten, but we do focus on manners. This is a constant constant effort and I feel like I fight the same battles every day at every meal.

Things that are constantly being reinforced:

  • Using kind manners (my kids DO say “EW GROSS I’M NOT EATING THAT.” My response is always “you do not have to eat anything you don’t want to eat. I do expect you to be kind. I spent a lot of time making this meal for you. Simply choose what you’d like to eat.”

  • Keeping their food on their own plate/ not stealing food from others. Again, this works for my kids— I know when they take food off their plates because they are being jerks. If your kid is a very picky eater or you are working on a trusting relationship, I recommend a “discard” plate or bowl for them to safely remove items that are intimidating to them.

  • At the end of the meal, they are expected to clean their area bring their plates to the sink. After dinner, they also clear their napkins and water cups (they use the same reusable napkin and cup all day).

  • Stay in your seat. This is very hard for the 2.5 year olds. We tried letting them sit on the bench but they were just too distracted getting down. I think that is a lot to ask of little ones. They seem to do much better when strapped into their booster seats, so that’s what they are doing now. They do great in there and don’t really ask to get down much. If they do, I just remind them that they can go play when everyone is done eating and the meal is over.

Things that are an immediate expulsion from the table: spitting, throwing food (this was not enforced with babies), potty talk, standing on the table. The 5 year old gets sent to his room for doing these things until he can sit at the table nicely and apologizes. the 2.5 year olds get strapped into their booster seats and pushed away from the table until they are ready.

I hope that was helpful. Let me know if you have any questions — I hope I answered them all!

XO

*As an Amazon Associate I earn from qualifying purchases. I may receive a small commission when you click a link and make a purchase, at no extra cost to you. I appreciate your support!

Favorite Things

I thought it’d be nice to keep a list of our most used, tried and true, favorite items in one place. This is not a curated list to look cute and organized — just things we actually use and LOVE. I will keep updating as I think of things to add.

Also, as a disclaimer, I feel the need to say this: the world is trying to sell you things in every direction. You are still a wonderful person if you do not buy any of these things for your children. They probably don’t care what lunchbox they have!! I am just sharing because I do get some questions on what we use/like. <3

*As an Amazon Associate I earn from qualifying purchases. I may receive a small commission when you click a link and make a purchase, at no extra cost to you. I appreciate your support!*

Baby Feeding

First Open Cup — Did you know that you can go right from bottle to open cup? No need for a sippy! I like these as a first open cup because they don’t tip over as easily

EZPZ mat — I loved feeding my kids meals their first meals with this mat! PSA — the mat will not fit on the IKEA highchair tray but the plate will.

360 sippy — we used these cups when out and about with this strap on their stroller or high chair.

Travel placemats — A lifesaver when going out to eat — no throwing plates! Tip — put it down right before serving food because they learn to peel the edges quickly!

Bibs — I think these two types (sleeved & catchall) are essential. If we ate something really messy like pureed soup, you’d better believe they wore both at the same time! Ha!

Travel Lunches

Small bell jars with plastic lids we use these all the time for lunches and beyond


Bentgo Kids We have LOVED this lunchbox! I think my kids got it when they turned 2 and that was a perfect age. My kindergartener still uses it and loves it. I love that the compartments are sealed very well — I can pack yogurt in one spot and it won’t leak into another section. They have been dropped and still look great.

Midi Demi Spoon & Fork from Crate and Barrel— I actually have had this since before kids! They are small and fancy (think cheese tray) but they are actually perfect to pack with school lunches!

Planetbox Rover We LOVE this lunchbox. It is not sealed like the bentgo so you can’t put yogurt in the compartments but it does come with a waterproof container for those kinds of things. Its long and flat so I did need to buy another lunchbox (the planetbox lunchbox) but my kindergartener says he prefers this to the bentgo. I think it may be a bit difficult for younger kiddos to open on their own.

SMALL water bottle At my son’s school you are allowed to go in and each lunch with them whenever you want. It was weeks into school and I surprised him and ate lunch with him. Boy was it an eye opener! For one thing, I realized he wasn’t allowed to bring his big water bottle into the lunch room (maybe something he could have told me!?) so he wasn’t drinking anything at lunch! I felt awful. Most of the other kiddos had capri suns or lunchboxes. We try to stick to mostly drinking water and I try to minimize adding to landfills so I found these after a long hunt. I’ve been so happy with them! I was hesitant to buy such a large pack but the price was right so I went for it. Surprisingly, I’ve found a lot of uses for them so far, outside of the lunchbox! They fit perfectly in both the pottery barn lunchbox and the planetbox lunchbox. I like that he can pack water or I can pack him apple cider, almond milk, or something special if I want. Outside of the lunchbox they’ve come in handy transporting liquids on trips (I’m picky about my coffee creamer and maple syrup!).

Napkins & tie dye kit Speaking of reducing waste, before my oldest started kindergarten, we had a special afternoon tie dyeing these napkins . It made him feel so special and he loves being able to use them only in his lunchbox. TIP: when tie dyeing with young kids, choose only 2 colors that mix well together! We used blue and yellow and have a lot of green napkins.

Stasher bag These are pricy but I’ve really surprised myself how much I’ve used them!

Full circle bags These do feel a bit cheaper than the stasher bags (a little thinner) but are just perfect for kiddos and they are half the price!! I got mine at home goods for even less — so check there!

Washi tape I use these to tape onto the snack bags with their names. They love the fun patterns. I can usually wash the bags a couple of times before having to replace the stickers.

Hard plastic snack containers I like these because they are very compact and perfect for things that get mushed easily (think raspberries or cereal). I have the double one that I pack sometimes for a fruit + veggie (raspberries on one side, pepper rings on the other).

Toddler / Preschool / Young Child Feeding

Corelle Salad Plates — I am kind of a minimalist (although not according to my husband…) and I don’t like having a lot of extra stuff around. The kids eat most of their meals on these salad plates. I’m not into having a bunch of kid plates around and I think they feel special having “adult” plates. They aren’t breakable, stack so nicely without taking up a lot of space, and still look new. We have a ton of these and the dinner plates and they are what we use when we have company over as well (I do break out our fine china on holidays).

Kids Utensils — I love that this set includes knives, perfect for cutting bananas or spreading peanut butter on toast. These aren’t plastic and look like just like smaller versions of our knives.

Smoothie Cups — These are the perfect size for toddlers / young kids. They come with smoothie straws and a nice sipping top as well (think hot cocoa). I like that they are stainless steel.

Water Bottle — These are the perfect sized water bottles for kids, in my opinion. It comes with two lids (straw and flip top), is spill proof, insulated (we kept them in the car all summer and they stayed cold), and much cheaper than the hydroflasks! Win win!

Everyday Cups (stainless steel) — These are what my kids use everyday. They come with silicone sleeves so they don’t argue over whose is whose. They each get the same color every day. Yes, they do spill them from time to time. They mostly drink water so it’s not a big deal to clean up.

Gray Barmop Towels — We’ve been using reusable napkins for the last couple of months now and it’s been so much easier than I’d ever thought! I really like these gray barmop towels (I can’t remember if mine are from Target or HomeGoods). They hide stains well and are very absorbent. The kids feel so special getting a “fancy” napkin. Unless they are really awful, they use the same napkin all day and I just throw them in the wash at the end of the day with the rest of our laundry.

Taco Truck Taco Holder — Not much to say other than we love these!! They are super fun and keep hard shell tacos standing up!

Cooking / Baking

Toddler Knives — To be honest my kids don’t love these crinkle cutters but I get a lot of questions on them so I will share if you are interested. They much prefer these. They each have their own set of knives and a small cutting board.

Glass Mixing/ Measuring Bowl — I’d never had one of these until recently and I am OBSESSED. I really find it a game to minimize as many dishes as possible and with the measuring markers on the side of this that’s easy to do. I love that it can go into the microwave so if you have a recipe that needs melted butter, melt it in here first then add the rest of the ingredients. The fact that it’s clear is awesome because you can see if you’ve thoroughly mixed the bottom (I never do!) and there’s a spout for easy pouring.

Quarter Sheet Pan — This is another thing I wish I’d discovered sooner. I love the small size of this pan. It’s the perfect size for reheating a few slices of pizza in the oven. I also use it a lot when bringing meat out to the grill or as a place to put meat when cooking.

Mini Square Pan — This is great for making boxed cornbread look fancy (or anything really! brownies, etc). I used it to make our green monster muffins too!

Nordic Ware Lotus Bundt Pan — Speaking of boxed mixes, my favorite thing to bring to a holiday is a boxed chocolate cake mix cooked in this pan dusted with confectioners sugar!! I love Bobs red mill brand. My kids think its so fancy and that the sugar looks like snow — no one misses the frosting! It really looks so fancy and who can be bothered making something fancy during the busy holiday season.

Y-Peeler — If you do a lot of peeling, please get yourself a Y-peeler! In OT school, we learned how awful a traditional peeler is at contributing to ulnar drift. Let me know if you want me to do a joint protection post haha!

Parchment Paper Baking Cups — so worth it. I’ll never go back to regular baking cups again.

Clothing

Toddler Bogs — These are pricey but in our area we get a ton of snow so necessary. Also they have good resale in our area. We try to find them on sale.

Toddler Boy Pants — Having 3 boys we go through a lot of pants! I love these so much and my boys actually tell me they are their favorite too. The khaki and gray color makes them look more dressed up but they are as comfortable as sweatpants.

Women’s Open Vest — This is my new favorite thing to wear around the house. It’s nothing fancy but the fleece is so soft and warm and much more stylish than a hoodie if someone stops by the house! I love that it has pockets for my phone or if my kid needs me to hold a toy.

Books (for adults)

Bringing up Bebe — Full disclosure: I read this book before having children (I was pregnant) and don’t know how I’d feel about it today. I do remember liking it and so many things still stand out in my memory 5 years later and I like a lot of my feeding philosophy came from this book.

Dear Mother — this is a wonderful book of short poems written with such raw emotion. It will make you laugh and make you cry. So relatable. A great gift for yourself or any mother you know.

No Bad Kids by Janet Lansbury — As with all parenting books, not every piece of advice will work for you. It was very easy to read (not a huge novel) and pick and choose which strategies work for me. I highlighted a lot of this book and I still reference it often. I really appreciate how it’s laid out. Its very respectful of toddlers — a wonderful book.

Retro Baby — This is a great book for expecting or new parents. It’s written by an OT so of course I’m in love. It gives some play ideas without using a lot of toys or “stuff.”

Simplicity Parenting — I almost didn’t recommend this book because, although it stressed simplicity, is very verbose and could have been condensed quite a bit. I didn’t agree with a couple sections, almost enough not to recommend this book at all (the biggest issue I had was that it said to limit the number of books you child has). BUT I still found the overall message something worth picking up the book as it has profoundly changed my current parenting status. The biggest takeaway I had from the book was (summarizing, not direct quote) “what did you imagine your life with children would be like before having them” and it helped me to reprioritize my time. How we schedule our days matter.. Lots of great quotes to highlight and remember if you can cut through the extra stuff. For example, I imagined a lot of baking and nature walks etc. and that’s not what we were doing. We were busy with a lot of other fluff (I’m looking at you, soccer for 2 year olds!). This helped me reprioritize my time to focus on what matters to us most as a family.

Siblings without Rivalry — to be 100000 percent honest with you I didn’t finish this!!! but I loved what I Read enough to recommend it. I’ve been implementing what I have read and notice a difference so much. I do think it was a bit wordy; I’d have probably finished if it were shorter.

One Line A Day 5 Year Memory Journal — Not really a book, but I’ve loved writing in this every day and looking back through the years. It’s been fun trying to think of things to add throughout the day, but don’t get me wrong there are some days where all I’ve written was “ANNOYED.” Those are still fun to read though and remember how far we’ve come!

Misc.

Portable 3-in-1 Potty — This thing has been a LIFESAVER. It comes with these special bags for going potty on the go (we’ve used it SO MANY TIMES in the car). It folds up and for a couple months I stored it in my diaper bag!!!! I’ve also had my kids go potty with it open just on the grass (not to be gross) but the last thing I need is for my boys to think they can go potty standing up on a tree haha. Seriously such a great investment and only $15. When the twins were potty training, it was a lot easier to keep one contained in their carseat and have the other one go potty then switch, than to take all 3 boys into a public bathroom.

Plastic Underwear Covers — Speaking of potty training, I get lots of questions on that. I basically go straight to underwear. When we go out of the house, these are really helpful. If they have an accident, I can just change their underwear without changing their pants as well.

Window Crystals — Young House Love has recommended these for awhile and I finally bought them. They are only $4 each and my kids love chasing rainbows every day!

Double Stroller — I really wish we had registered for this stroller for our first and just added a second seat when the twins were born. Instead we had to buy this whole thing on our own (along with another crib and another mattress an car seat etc etc etc). This is nice that it’s narrow, so perfect for doctors appointments or stores. I still use it with the twins being 2.5 years old; it’s nice that you can face them away from each other. I also have this attachment seat for our older child.

Wine Holder (to store water bottles) — These fit our travel coffee mugs and water bottles perfectly!

Learning Tower — My in-laws got this for my oldest son for his first birthday and we’ve used it EVERY SINGLE DAY since. The height is adjustable. It’s big enough now to fit all 3 boys and we’ve had so many memories cooking and baking together with them standing on the tower <3

Countertop Composter — I’m too intimidated to have a composter but luckily our neighbor has one and lets us add our stuff to it. Honestly, having this countertop composter has made it so easy! It doesn’t smell and I can drop off our scraps every other day or so. I may even invest in a composter after doing this — it really is so easy!

2019 Holiday Gifts

I thought I’d put together a list of what I’m adding to my boys’ wish lists this year. For reference, J is 5.5 years old, L & V are 2.5 years old. Also, this is not everything they are getting! Just a list I put together for grandparents to choose from if they want some ideas. My husband and I keep gifts VERY light on Christmas for our boys — we are so lucky that grandparents, aunts/uncles, and great aunts/uncles are very generous. My husband and I like to spend our money and effort making the holiday magical in other ways throughout the month with an advent calendar (post coming soon!), different activities, a Christmas Eve box, stockings, and hosting brunch for our whole family on Christmas morning.

*As an Amazon Associate I earn from qualifying purchases. I may receive a small commission when you click a link and make a purchase, at no extra cost to you. I appreciate your support!*

Rolling Storage Cart — We are going to do a playroom refresh and this will store all of the legos!

Visual Measuring Cups — How cute are these!?

A NUGGET!! I know this has already been purchased — they are going to flip!

Scooters —Reading through the reviews I think that this larger size will be ok for the younger ones to grow in to.

Name Puzzles — I have these on for the 2.5 year olds. I like that the first letter is capitalized and the rest is lower case, like how they will learn to write their name.

School Photo Insert — I plan on just getting the insert and buying my own frame, but they also sell the whole frame as an option, too.

Calligraphy Magic Drying Cloth — Can write on with water and it disappears!

Swing — The twins have a little nook off of their bedroom and I’d love for it to be a lounge area and this swing seems so fun!

Squishy Human Body — My 5 year old loves all things medical and this came recommended from a friend

Fraction puzzle — for the 5 year old

Woodland Friends Sewing Kit — my 5 year old also said he wanted to learn how to sew!

Taco Truck Taco Holders — We already have 2 of these but we have 3 kids :)

Abacus — I will get this from IKEA because it’s cheaper there, but in case you don’t have one by you here is one from Amazon.

Name tracing board — for the 2.5 year olds

IKEA table — this can be used as a sensory table and as a regular table. Plan on using this for LEGOS on one side and sensory bins as well. Also plan on getting the coordinating stools.

Dollhouse / shelf — group gift to all boys. Will also get furniture from IKEA to go in.

Knife and peeler — I think I will get one of these for each boy. I don’t think the twins are ready quite yet but will be soon and our IKEA is far away so I may hold onto them for their 3rd birthday.

Non-Toy Ideas:

  • Movie passes

  • Art classes

  • Ski lessons

  • Ski gear

  • Private swim lessons

  • Memberships — Zoo, Children’s Museum, Science Museum, Art Museum

"Are You Happy Mommy?"

“Are you happy mommy?” he said as he looked for boogers in my nose while I was roaring laughing. “Yes V, I’m very happy” I said to my sweet 2 year old as he kept looking to get more laughter out of me.

The look on his face when he saw me laughing was jolting. In that one second glance I realized he doesn’t see me joyful often. More truthfully, he doesn’t see me joyful much at all lately, which is unsettling as my children make me happier than anything on earth.

Being a (mostly) stay-at-home mom is a big hit financially for our family. It’s a job that I take very seriously.

I make sure holidays and birthdays are magical, offer a variety of foods, keep everyone on schedule, make sure their lives are enriched but not overscheduled, make sure they use their manners. I try to foster a respectful brotherly bond, go to book club, bring them to the park, work out, upload to one second a day, enter in my 5 year daily journal. I make sure the family yearbook is done, help my kindergartener learn to read, push them to their highest potential, work, cuddle them, keep them alive, facilitate independence, be a semi-decent wife. I go to therapy, make sure they see their grandparents enough, try to keep the house clean, make sure everyone has a winter coat, think about holiday cards in the fall, keep up with the laundry, create bucket list items for each season and work hard to fill them etc, etc etc etc etc. The list goes on and on and on and I know it’s familiar to everyone. I’m great at checking the boxes of obligation. I (try) not to yell much. I schedule in “fun” time like movie nights and family dates. The problem is, parenting isn’t a job. It’s hard and it’s all-consuming, but it isn’t a job.

I am happy and content at the end of a long day; my husband and I talk about our kids all night and smile about how they are the best kids on the whole planet and resist the urge to wake them up and cuddle them. But during the day, I am a task master. The day runs as smooth as butter. The kids know what is expected of them. We check the boxes: check, check, and check. We do the activities. We do the reading. We do the healthy homemade meals. We do the baths. We do the early bedtime. Even game night is about taking turns and waiting and counting and matching and being a respectful winner and being okay with losing; there’s not much fun to be had. The joy is gone.

Don’t get me wrong; I smile throughout the day and we make jokes. They are not walking on eggshells like I did with my mother. But I don’t want my kids to remember me as a task master. I want them to inherently KNOW that they bring me joy — without me having to tell them. I don’t want them to put their heads down and work hard all day— I want them to enjoy life and find ways to be silly and joyful throughout the day.

So now what?

That part, I’m not sure. I am the type of person that beats myself up and constantly tells myself to “be better” but that never actually works. I am learning to make smaller, more concrete goals. For now, I am going start by letting my kids see me genuinely laugh and be silly with them at least once a day. This is where I need your help — in what ways do you like to be silly with your kids? I’d love some ideas!

xo

Yia Yia's Spanakopita

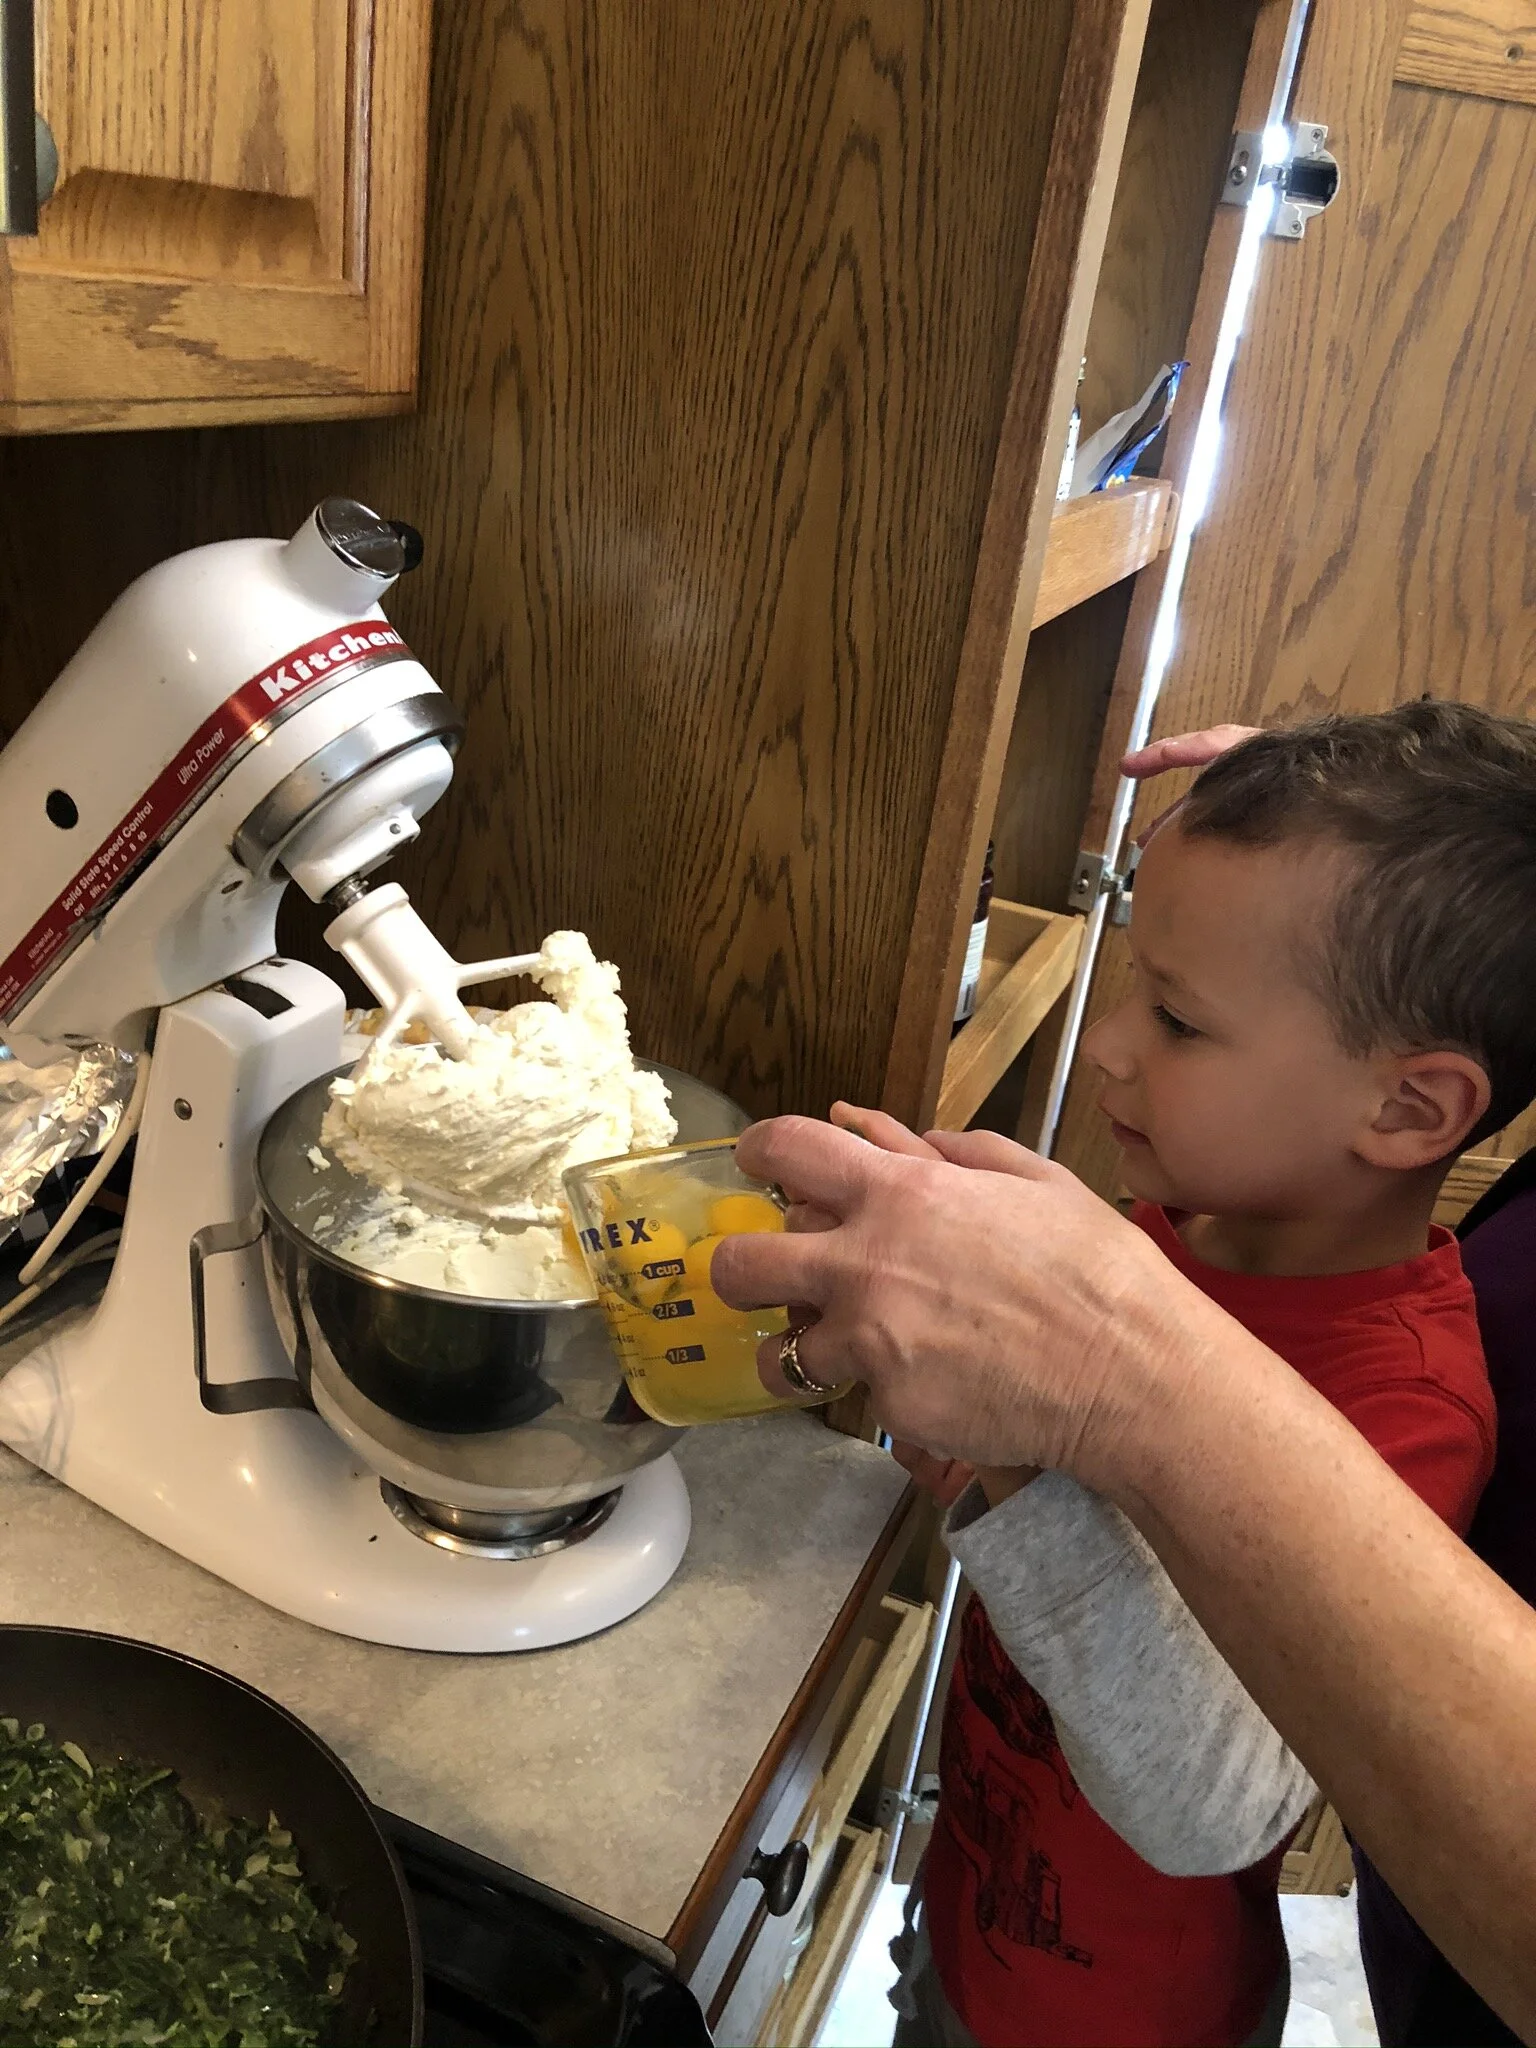
I feel so honored that my mother-in-law (my children’s yia yia) showed my son and I her wonderful recipe and that she is letting me share it here! A few Christmases ago, she made all of her children a cookbook with all of the family’s favorite recipes and of course this was in it, but there’s nothing like being there with her to learn from the best! She shared how this recipe has evolved from each woman in her family, each putting their love and special touch on it. This spanakopita is served at all of the holidays and is such a special treat. My son and I had so much fun with her! It’s very rich and creamy in the center (no cold and slimy spinach here!) and flaky and crispy on the top and bottom. It freezes very well (which is why the recipe makes two pans); we made these to put in the freezer for Christmas! It’s also great to have on hand in case you get unexpected guests or get invited to a party last minute and want to bring something!


IMG_4921.JPG

Yia Yia’s Spanakopita

(makes 2 trays)

  • 2- 9x13ish disposable baking pans (NOT the deep lasagna pans)

  • 2.5 sticks of butter (approximate) — melted

  • 1 pound feta — packed in water is best. Yia yia says sheep’s milk is best if you can find it

  • 2 tablespoons extra virgin olive oil

  • 2 cups onions — diced

  • 24 ounces frozen chopped spinach — thawed in bags or box

  • 2- 8 ounce packages Philadelphia cream cheese (the brick) — at room temperature

  • 6 eggs

  • 1 pound phyllo pastry sheets (from the freezer section) — thawed completely and at room temperature. Thaw in the refrigerator for at least 24 hours and then bring to room temperature on the counter but leave in the plastic wrapping. If you find one that comes in a pack of 2 this is ideal (one box of phyllo totaling 1 pound, but two rolls wrapped in plastic in the box)

  1. Preheat oven to 375 degrees F.

  2. Melt butter if you haven’t already.

  3. Drain feta and mash lightly on a plate with a fork, making sure to leave some chunks.

  4. Heat 2 tbs EVOO in large sauté pan over medium heat. Sauté onions over medium heat for a minute or so to “get them going” then lower the heat to low and sauté them low and slow for about 15 minutes. You want them very translucent but not brown.

  5. Meanwhile, in the bowl of a standing mixer, beat cream cheese with the paddle attachment for a couple of seconds then slowly add the eggs. Cream the cream cheese and eggs together on medium, scraping the sides down as needed .

  6. When the onions are translucent, add the spinach (don’t drain it) and increase the heat to medium/medium high. Stir them frequently and cook for 15-20 minutes until the spinach is dry and cooked through.

  7. Meanwhile, add the feta cheese to the cream cheese and egg mixture and mix gently until incorporated but not enough to make the feta smaller.

  8. When the spinach is finished, add the spinach to the cheese and egg mixture and mix to combine.

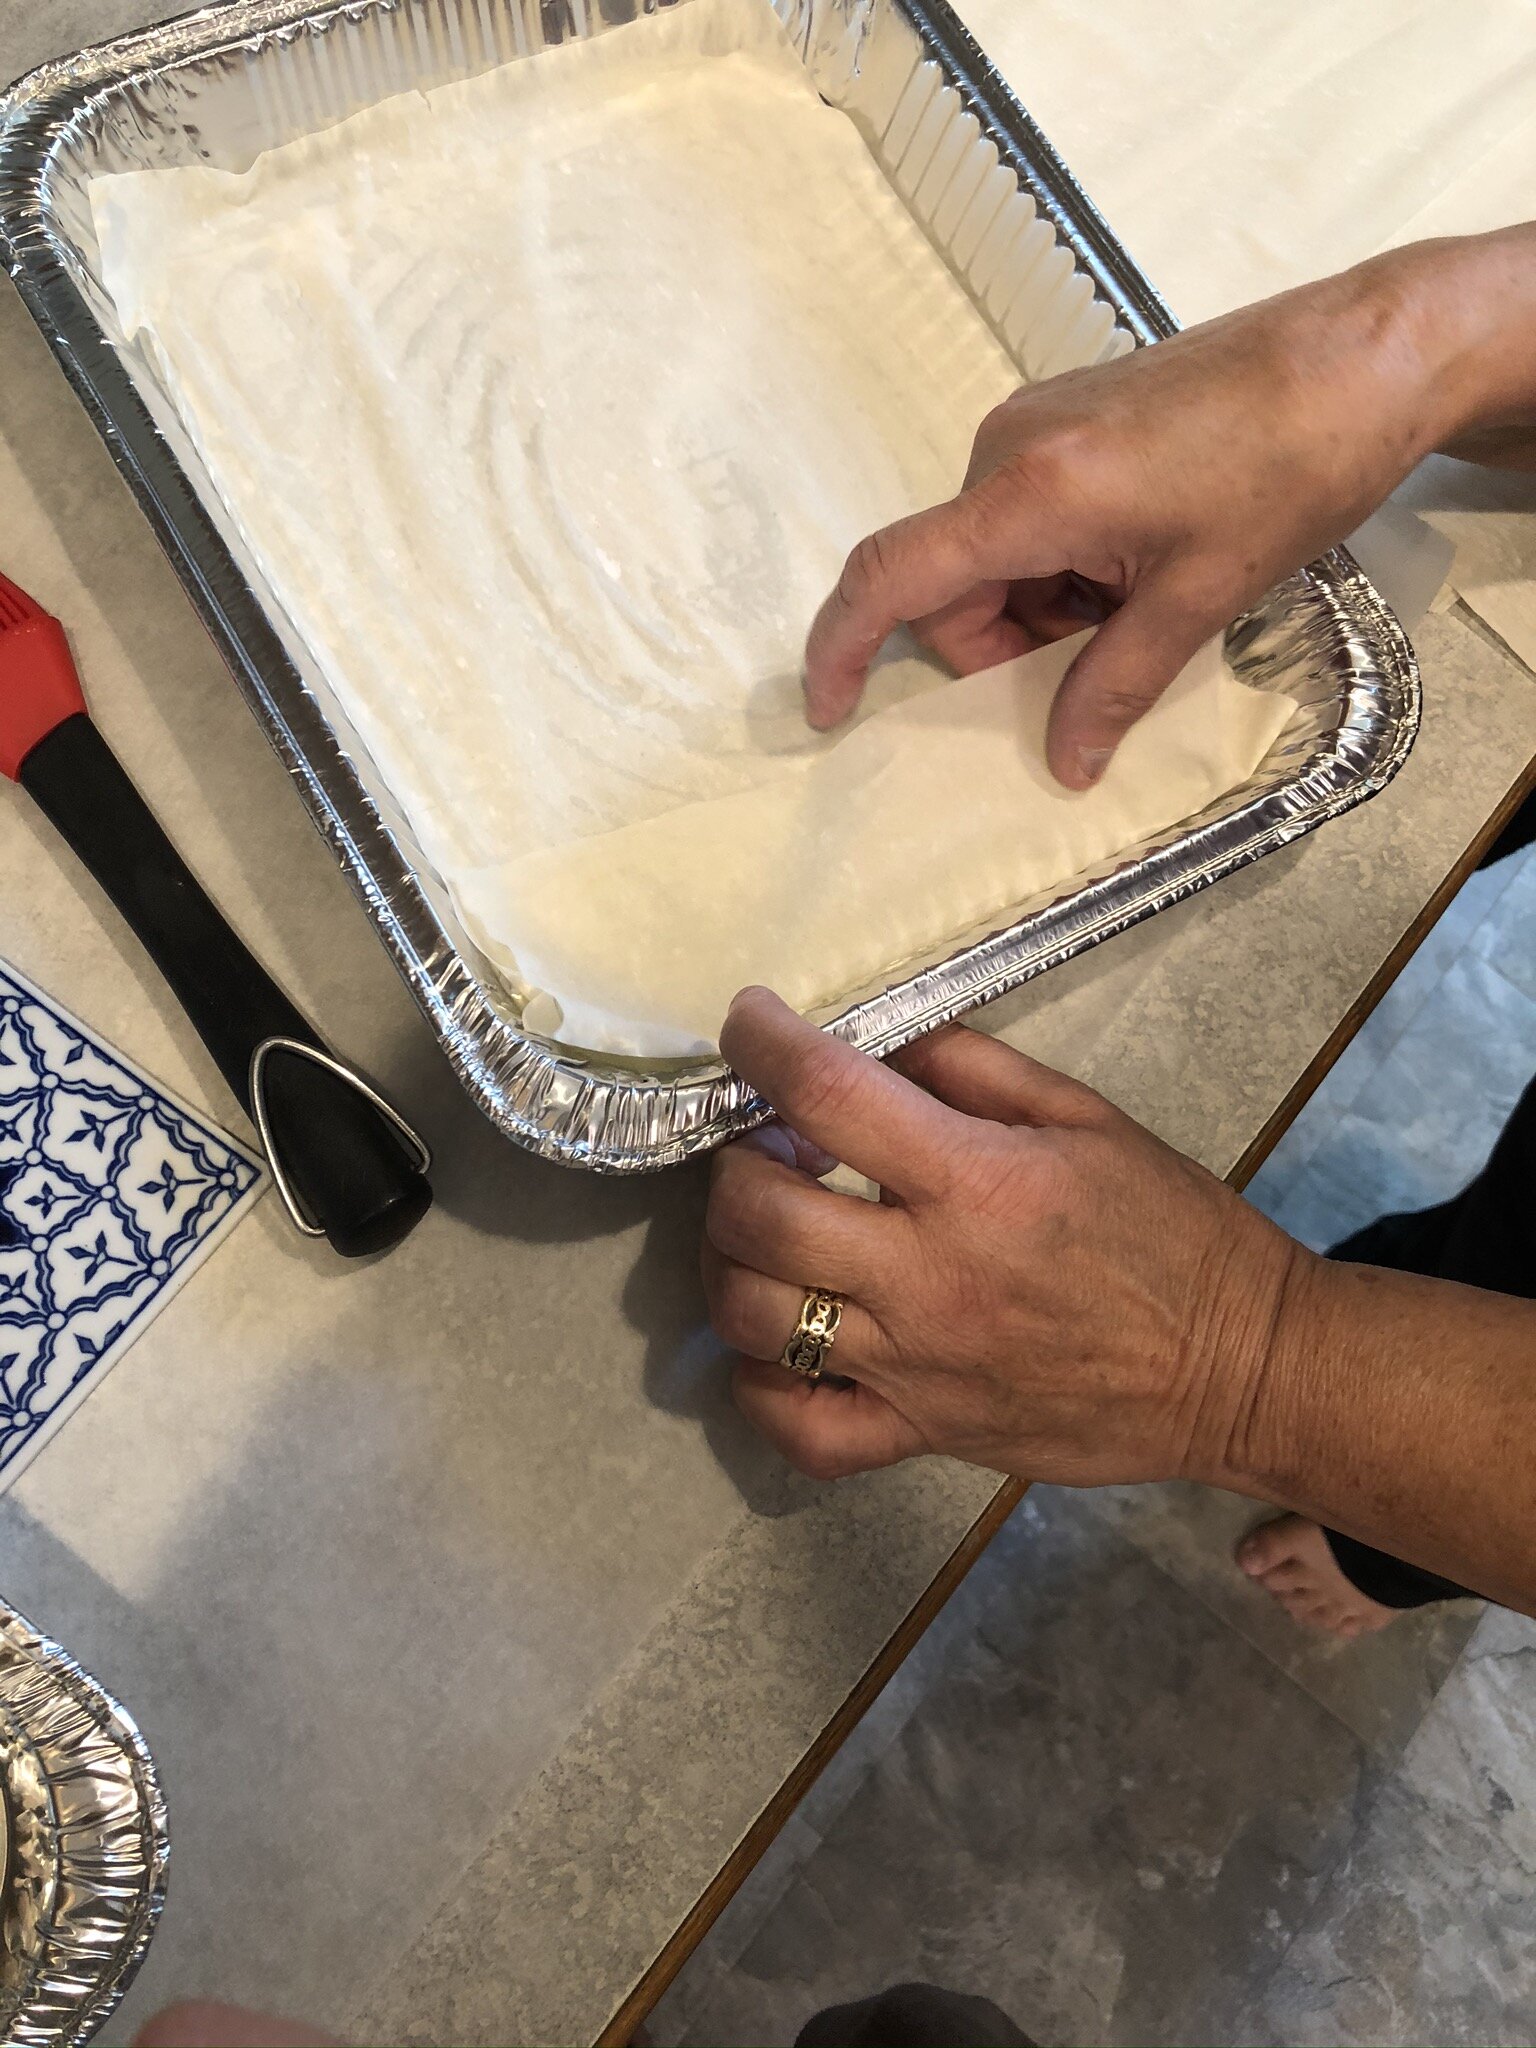
  9. Prepare your work station for this next part— you have to work quickly! Yia yia likes to put a sheet of parchment or wax paper down on the work surface. She puts the two pans vertically in front of her and the melted butter between them. Make sure the spinach and egg mixture is close by.

  10. Dip a pastry brush in the butter and brush melted butter on the bottom of both pans.

  11. Open one of the phyllo packages and lay 1-2 sheets on top of the buttered pan. You may need to fold down one side to make it fit, that’s ok. Don’t worry if the sheet is a little long, you don’t have to fold it if it goes up the sides slightly.

  12. Working quickly and doing both pans at the same time, continue to layer brushed butter and 1-2 layers of phyllo, brushed butter and 1-2 layers of phyllo, etc etc until half of your total phyllo is gone (if you found a box with 2 packs, until 1 is gone). You want to coat the entire surface with butter but do not want it to pool with butter or it will be too soggy.

  13. Once half of your total phyllo is gone, mix the spinach mixture again, and evenly divide it between the two pans.

  14. Continue the process with the rest of phyllo; alternating brushed butter and 1-2 sheets of phyllo until all of your phyllo is gone.

  15. Brush the top layer of phyllo with butter.

  16. Using a spoon, tuck along the sides and corners.

  17. Bake for 20-35 minutes, until the top is golden brown and the center is bubbly warm.

  18. Enjoy warm!

To freeze:

  1. Let cool and wrap with plastic wrap then aluminum foil.

To reheat:

  1. Preheat oven to 375 degrees F

  2. Remove all plastic wrap and foil and bake from frozen.

  3. Keep an eye on it — if the top gets brown, loosely cover with foil (try not to cover it if you can as the steam will make it mushy). Remove when the middle is hot; this may take up to 1 hour.

Easy Microwave Applesauce

I feel silly even posting this recipe because it’s so easy! But I didn’t know you could make applesauce in the microwave until my mother-in-law showed me how, and it was groundbreaking to me! So I thought I’d share it here. She adds a bit of sugar to hers, but the kids and I like it without the sugar just as much! My mother-in-law sometimes adds some pears and that is delicious.

Easiest Microwave Applesauce

  • 6 apples/pears (at least, can fill bowl) — peeled, cored, and sliced into 6 pieces (use your apple cutter)

  • 1/4 cup water or apple cider (no need to increase the amount of liquid if you increase the number of apples)

  • 1 teaspoon of cinnamon (optional)

  1. In a microwave-safe bowl, combine apples and liquid. Cover.

  2. Microwave on high for 10-15 minutes, stirring halfway through. Be careful, the bowl will be hot!

  3. Use a fork or potato masher to get applesauce to desired consistency. Add cinnamon if using.

Store applesauce in the fridge for a couple of days. You may freeze in a freezer safe container once cooled in the fridge. I like to divide into small portions in a quart size freezer bag, making sure it’s flat when freezing for easy storage.

FEARMONGERING

Someone on Instagram messaged me the other day about the ingredients in an RX bar since I had shared a photo of my child’s lunch with an RX bar. She was very kind and simply shared that she saw someone else’s post about the company falsifying the ingredient list and wanted to let me know in case I wanted to look into it further. I checked out the account and saw the post she was referring to. There was a lot of red and bolding and underlining and a whole lot of fearmongering. I was honestly horrified and was just about to leap out of bed and go downstairs to remove it from my son’s lunchbox and try to find a last minute protein.

I stopped myself there and said WAIT JUST A MINUTE. I have my own brain here. I have a masters degree and can use my mind to think critically. So I started to look into this myself (you can read one of the articles I saw HERE if you’re interested, but that’s not what this post is about).

My point here has nothing to do with the RX bars. I found myself quickly going down a rabbit hole researching this and that and protein requirements and wxyz. We are BOMBARDED with information and have the world at our fingertips. To someone like me, this can be practically debilitating. I am not a nutritionist or a doctor and I don’t have time to stay up to date on all of the current research; I am an anxious mother trying to navigate through this information-rich world trying to do what’s best for my children. The last thing I need is a fearmongering post about what I feed to my children. This is a tricky subject and fine line because I DO care about the ingredients my kids eat.

I also care about my kids’ relationship with food.

My kids (for the most part) are not picky eaters. I could honestly probably get them to eat a “perfectly clean” paleo-type diet. They enjoy meats, vegetables, fruits, and nuts and eat them in abundance. We don’t live in this paleolithic world, though. We live in a world with obesity, eating disorders, depression, decreased self-esteem, birthday cakes, and pizza parties. I want my children to grow up and become adults that can go to another country and enjoy all of the foods that country has to offer. I don’t want them to worry about the gluten in the pasta in Italy, the dairy in the cheese in France, or how the desserts are sweetened in Spain. I want them to eat vegetables because they ENJOY them not because they HAVE TO.

As parents we are so judged based on the foods we feed our children and the foods we don’t feed our children. Food is a very sensitive subject for people, especially parents. I’ve been judged by people who think I feed my kids too many “healthy” foods and I’ve been judged for ordering them pizza when we go out to eat.

I never cared about the nutritional value of the foods I ate until I became pregnant with my first child. I had gestational diabetes and changed my diet significantly. I came across a fearmongering food blogger and I got SO wrapped up on every single ingredient I ate. It got to the point that I was avoiding drinking WATER (we had a well and I was nervous to drink that water and we were buying bottled water until I found this blogger. I switched to only drinking water out of glass jugs that I had to refill at Whole Foods 40 minutes away. When I was low on those I would consider not drinking water until I refilled my glass jugs).

THE. FEAR. MONGERING. NEEDS. TO. STOP.

Parents (especially new parents) have so much information thrown at them. Self-doubt is basically built into becoming a parent. We need to create a positive environment around food. ALL FOOD. We need to stop judging ourselves. We need to stop judging each other. We need to stop with the unnecessary fearmongering.

The thing is, no one knows FOR SURE about any of these ingredients. Our mental health is so much more important than the ingredient lists we feed our children.

Let’s focus on offering mostly whole foods and lots of vegetables, modeling a nonjudgmental attitude around food and eating choices (ours and others), celebrating life’s milestones with delicious food as people have been doing for centuries, and worry less about the rest. Let’s fight back from the fearmongering and use those brains of ours. Who’s with me!?

xoxo

Apple Crisp

We take apple crisp very seriously in this house! One of our favorite traditions is going apple picking and of course apple crisp comes next. It so warm and comforting and we all love it! This recipe is adapted from America’s Test Kitchen; there was a time when we were gluten and dairy free exclusively so I came up with this recipe. We are not strictly gluten or dairy free anymore, but still make this recipe because it’s so delicious! Bonus: it’s only sweetened with honey (but I won’t tell anyone if you sprinkle some brown sugar or coconut sugar on top when its done ;) ) We LOVE a very high crisp to apple ratio so that is what you’ll see here. If you like more apples, add some more apples, if you like less crisp, use a light hand when measuring the crisp ingredients.


Apple Crisp

Filling

  • 4 pounds apples (weigh before peeling and cutting) — peeled, cored, and cut into 6 slices or 12 chunks each. The internet recommends golden delicious, granny smith, or honeycrisp but I honestly just use whatever combination we get from our farm share and apple picking and sometimes we throw in some pears for good measure. Just know that moisture content varies greatly between apple varieties and you may have a more watery crisp if you try something new.

  • 1 tablespoon honey

  • 1/2 teaspoon cinnamon

  • 1/2 teaspoon nutmeg

  • 1/2 lemon — zested and juiced

  • 1 cup apple cider

  • 1 tablespoon coconut oil

Topping

  • 1.5 cups almond flour

  • 1.5 cups pecans - finely chopped

  • 1.5 cups old fashioned rolled oats

  • 1 teaspoon cinnamon

  • 1/2 teaspoon nutmeg

  • 1.5 teaspoons salt

  • 7 tablespoons honey

  • 6 tablespoons coconut oil (softened or melted)

  • Coconut sugar // maple sugar // or brown sugar (OPTIONAL) to be sprinkled on before serving

Method

  1. Preheat oven to 450 degrees F.

  2. Add apple cider to large skillet over medium high heat until reduced to 1/2 or 1/4 cup. Transfer to a measuring cup with lemon juice and zest.

  3. Mix apples, honey, cinnamon, and nutmeg in a large bowl.

  4. Melt coconut oil in same skillet and cook apple mixture over medium heat until translucent and mostly cooked to your preference for apple crisp as it will not cook for very long in the oven. Add splashes of water or cider if your pan is getting too hot.

  5. Meanwhile, wipe out large bowl and combine topping ingredients. It should be wet enough that you can form small balls. If it’s too dry, add a bit of honey and/or coconut oil until its the right consistency.

  6. When the apples are done, transfer them to a 9x13 baking dish, add the apple cider mixture, and top with topping (I told you it was a lot!)

  7. Bake at 450 degrees F for 10-15 minutes until top is crisp.

  8. Sprinkle optional sugar on just before serving if desired.

  9. Enjoy!


Simple Weekly Menu

The start of this school year has me more exhausted than ever. I’ve been feeling the need to simplify my life even more lately, especially at mealtimes. A lot of people I talk to have a weekly meal plan that they eat and it got me thinking! I’ve never done that before because I can get sick of a food quickly but I thought it would make my life easier if I made a simple category for each day of the week with written out options of our tried and true favorite recipes. It’s been a big help so far and can help kick me out of decision paralysis! This is what I have so far and I plan on building on it as time goes on. I’ve added some free printables at the bottom for easy reference — feel free to screen shot or print! I would love to know if you have any favorites we can add to the list as well — please share! :)


Monday: New Recipe // Tried & True Easy

Sometimes our weeks are stressful and sometimes they are more relaxed. On weeks we have less going on, I’ll make a recipe I’ve been wanting to try and on weeks we have a lot going on, I'll make one of our tried and true easy meals. I’ll link our favorite easy recipes below.

  • sausage and bell pepper skillet

  • meat loaf (serve with baked potatoes since the oven is already on and frozen vegetables)

  • brie, apple, and bacon sandwiches with a side salad

  • cashew beef

  • eggroll in a bowl

  • tuna cakes

  • bean pasta with tuna and trader joe’s vegan kale pesto

  • shrimp scampi (garlic, evoo, lemon) with shrimp and frozen veggies or zoodles

Tuesday: Grill or Roast Meat + Vegetable (add rice if needed)

This one is so simple. Pick a protein and veggie and dump them all onto the grill or a sheet pan and roast! I don’t want to offer a low carb meal to my kids, so if we are lacking carbs I will add microwave rice or some fruit.

  • Proteins: burgers, steak, sausage, chicken thighs, fish, pork tenderloin

  • Vegetables: brussels sprouts, butternut squash, carrots, potatoes, sweet potatoes, cauliflower, peppers, broccoli, onions, zucchini (best for grill).

Some of our favorite combinations so far:

  • Burgers // zucchini and onions // microwave rice // BBQ sauce (grilled)

  • Italian sausage links // fingerling potatoes // peppers // onions (great grilled or roasted)

  • Pork tenderloin // brussels sprouts or broccoli // served with jarred applesauce (roasted)

  • Chicken thighs // butternut squash // red onion // thyme (roasted)

  • Roasted broccoli // broiled salmon

Wednesday: Soup // Salad // Add Rotisserie

  • yellow pepper soup // top with bacon OR serve with rotisserie chicken

  • sweet potato chili

  • Roasted butternut squash soup

  • Pumpkin soup (recipe coming soon!)

  • Split pea and ham soup

  • Lamb stew (recipe coming soon!)

  • White chicken chili — I omit the cream and use EVOO instead of canola oil I also usually use a rotisserie chicken

  • Chicken noodle soup

  • Salad with buffalo chicken

Thursday: Tacos or Fajitas

  • black bean & sweet potato tacos

  • blackened salmon tacos // confetti corn

  • regular beef & cheese tacos with broccoli slaw

  • fajitas (grilled or in pan)

  • enchiladas verdes (recipe from the defined dish — I used canned roasted tomatillo salsa and added shredded zucchini)

Friday: Takeout + Movie Night

  • pizza

  • Thai

  • sushi

  • Chipotle

Saturday: Flexible (Date Night // Family Out // Leftovers)

Favorite babysitter dinners (can be made ahead of time, lower risk of choking):

Sunday: Slow Cooker // Snack Board // Prep 1 Thing

Admittedly I am not the biggest fan of slow cooker meals! To me a slow cooker meal should be simple and not require a lot of finishing touches after it’s been cooking. This is what we’ve liked so far:

  • Pulled pork - I always take the sauce at the end and put it in a sauce pan and reduce and add to the shredded pork for a thick sauce. We serve it with broccoli slaw.

  • Asian short ribs - I like to serve this with green beans and microwave rice.

  • Tikka Masala - recipe from the defined dish

  • Salsa + chicken

Since I don’t need to fuss much about dinner with slow cooker meals, it frees me up to prep 1 thing for the freezer or for the week. I’m not great at meal prep but find I can usuaully talk myself into making one thing.

For the freezer:

  • waffles

  • pancakes

  • muffins

  • “uncrustables”

  • pizza roll-ups

  • zucchini bread

  • traditional meatballs

  • asian pork meatballs

For the week:

  • make a salad dressing

  • roast sweet potatoes and cook chorizo

  • hard boil eggs

  • make a breakfast bake (love this strawberry oatmeal one and I always double it)